The EPS (Expanded Polystyrene) moulding process is fundamental to transforming raw materials into versatile foam products. As industries increasingly prioritize environmental responsibility, integrating sustainable considerations into every stage of EPS moulding becomes crucial. This blog will delve into the key aspects that contribute to a more eco-friendly and resource-efficient production cycle.
From optimizing energy consumption during expansion to minimizing waste and embracing circular economy principles, sustainable EPS moulding is a multifaceted endeavor. By focusing on these essential considerations, manufacturers can not only reduce their environmental footprint but also enhance their operational efficiency and product quality.
What is EPS Moulding?
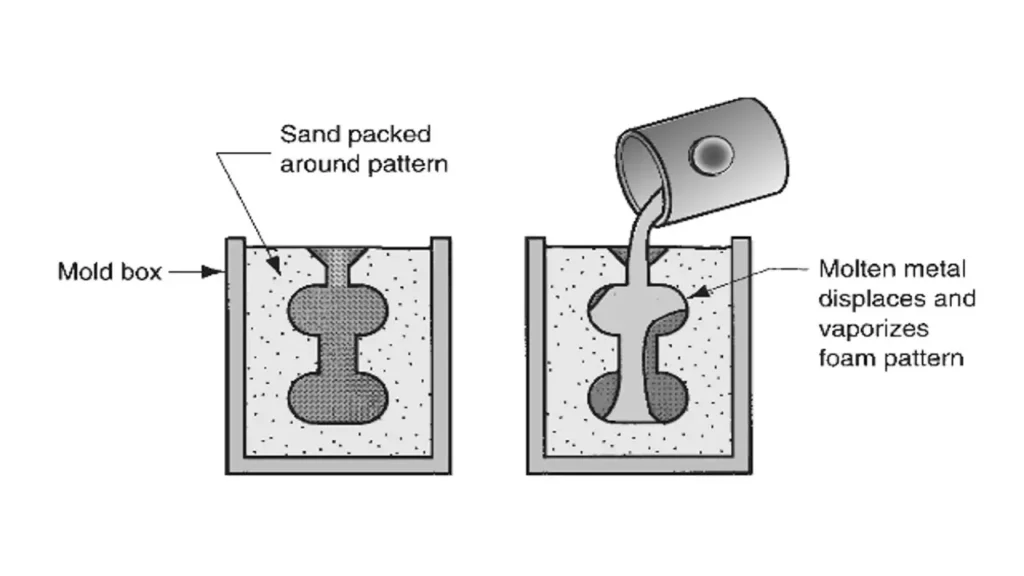
EPS (Expanded Polystyrene) moulding is a manufacturing process that transforms small, pre-expanded polystyrene beads into lightweight, rigid foam products of specific shapes and sizes.
The process of moulding EPS typically involves introducing these pre-expanded beads into a mold cavity, where steam is applied. The steam causes the beads to expand further and fuse together under heat and pressure, conforming precisely to the mold’s design.
After a cooling period to solidify the foam, the finished EPS product is ejected. This method is crucial for creating a vast range of items, from protective packaging and construction insulation to intricate components for various industries, leveraging EPS’s excellent thermal insulation, shock absorption, and lightweight properties.
EPS Moulding Process
The EPS (Expanded Polystyrene) moulding process is a sophisticated and highly engineered manufacturing sequence that meticulously transforms small, pre-expanded polystyrene beads into a vast array of lightweight, rigid, and insulating foam products. This intricate process is fundamental to producing materials with tailored properties, whether for high-performance thermal insulation in construction, robust protective packaging, or custom components for various industries.
Each phase of the moulding process is critical, directly influencing the final product’s density, structural integrity, dimensional stability, and overall performance characteristics. A deep understanding of these steps is essential for achieving optimal product quality and process efficiency.
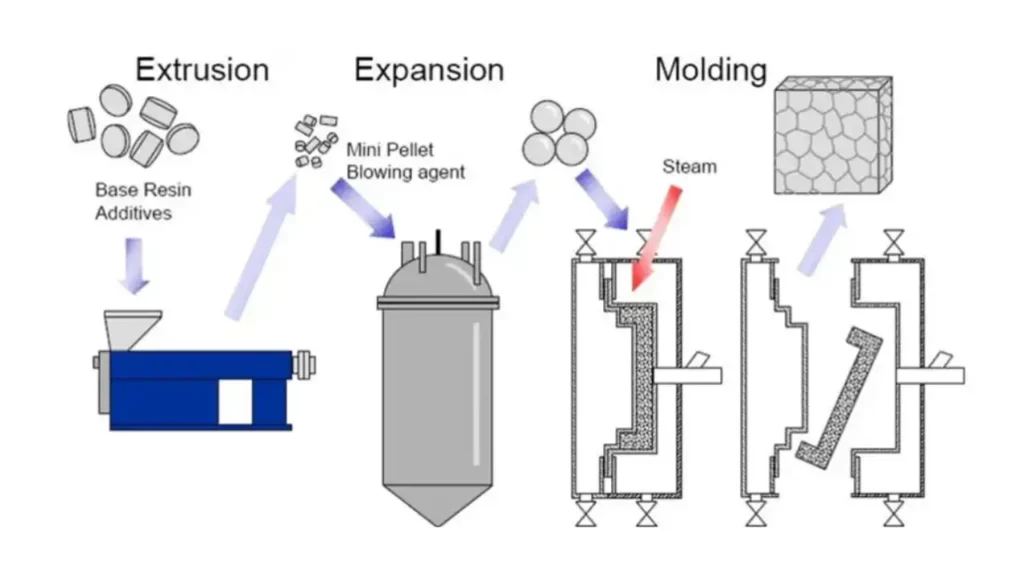
Step 1: Pre-Expansion of EPS Beads
The EPS moulding journey technically begins with the pre-expansion of raw polystyrene beads. These virgin beads, typically translucent and bead-like, are impregnated with a blowing agent, most commonly pentane, during their initial polymerization.
In the pre-expansion stage, these beads are fed into a pre-expander, which is often an agitated vessel equipped with steam injection capabilities. As steam is introduced, it rapidly heats the polystyrene beads, causing the polymer to soften. Simultaneously, the pentane within the beads vaporizes and expands due to the increased temperature and its lower boiling point. This rapid expansion causes each individual bead to “pop” and inflate, similar to popcorn, dramatically increasing its volume.
The degree of pre-expansion is precisely controlled, as it directly dictates the bulk density of the resulting EPS foam. Operators meticulously adjust parameters such as steam temperature (ranging typically from 100∘C to 120∘C), steam pressure, and the residence time of the beads within the pre-expander.
By varying these factors, they can achieve a wide range of densities, from very low-density beads for lightweight insulation to higher-density beads for applications requiring greater compressive strength. This pre-expansion is a single-stage process or, for very low densities, a multi-stage process where beads are expanded in successive steps with intermediate conditioning, ensuring uniform cell structure and density distribution.
Step 2: Conditioning/Aging of Pre-Expanded Beads
Following pre-expansion, the now fluffy, highly porous, and somewhat fragile pre-expanded beads are pneumatically conveyed into large, often mesh-sided, storage silos or breathable bags. This stage, known as conditioning or aging, is crucial despite its seemingly passive nature.
During the rapid cooling that occurs immediately after pre-expansion, a partial vacuum forms within the closed cells of each bead, and some of the pentane blowing agent condenses back into liquid form. The conditioning period allows ambient air to slowly diffuse through the permeable cell walls of the beads. As air enters, it equalizes the internal pressure within the cells with the external atmospheric pressure, and the remaining pentane evaporates.
This equalization process serves several vital functions. Firstly, it stabilizes the internal pressure of the beads, preventing them from collapsing or shrinking excessively during subsequent handling or prior to the final molding step. If beads are molded too soon, the internal vacuum can lead to poor fusion and dimensional instability in the final product.
Secondly, the absorbed air acts as an “internal spring,” providing the necessary resilience and expansive force for the beads to re-expand and properly fuse together when subjected to heat again in the molding machine. The conditioning time varies based on the bead density, ambient temperature, and humidity, typically ranging from 6 to 24 hours, ensuring the beads are robust and ready for the next phase.
Step 3: Filling the Mold
With the pre-expanded and conditioned beads ready, they are precisely transported to the molding machine. This machine houses a specialized mold cavity, meticulously engineered to the exact dimensions and intricate details of the final EPS product. The filling process involves pneumatically conveying the beads into this pre-heated mold. The goal is to achieve a uniform and rapid distribution of beads throughout the entire mold cavity, ensuring consistent density and preventing voids or uneven areas in the final product.
Modern EPS molding machines utilize sophisticated pneumatic systems and sensors to control the filling process. This often involves a “fill gun” that injects the beads, sometimes with assistance from vacuum systems on the opposing side of the mold to pull the beads into complex geometries.
The mold itself is pre-heated to a specific temperature to ensure that the beads flow smoothly and do not cool down prematurely, which could hinder proper fusion in the next step. Efficient and consistent mold filling is paramount, as any irregularities at this stage will directly translate into defects in the finished EPS product.
Step 4: Steam Chest Molding
This is the core of the EPS moulding process, where the magic of transformation truly happens. Once the mold is completely filled with conditioned beads, steam is rapidly injected into the mold cavity, typically through numerous small nozzles or “steam chests” lining the mold walls.
The high-temperature steam (often 110∘C to 130∘C) serves two primary purposes: it heats the pre-expanded polystyrene beads to their softening point (around 90∘C to 100∘C) and causes the residual pentane within the beads to re-vaporize, along with the entrapped air to expand.
As the beads soften and re-expand, they are forced to press tightly against each other and against the internal surfaces of the mold. Under the combined effect of heat and pressure, the softened outer surfaces of the individual beads fuse together, forming a strong, cohesive, and monolithic structure.
This process creates the characteristic closed-cell foam architecture of EPS, where the individual expanded beads are permanently welded into a unified whole that perfectly replicates the shape of the mold cavity. The precise duration and pressure of the steam cycle are critical, ensuring complete fusion without over-heating, which could lead to cell collapse or uneven density.
Step 5: Cooling
Immediately following the steam chest molding, the newly formed EPS product, still very hot and relatively pliable, undergoes a crucial cooling phase. This is typically achieved by circulating cooling water through dedicated channels within the mold walls.
The rapid reduction in temperature serves to solidify the polystyrene, causing the polymer to harden and allowing the molded product to retain its precise shape and dimensional stability.
Effective cooling is paramount to prevent the product from deforming, shrinking excessively, or collapsing upon ejection from the mold. It also contributes to reducing the internal pressure within the EPS cells, further stabilizing the foam structure.
The cooling time varies based on the product’s thickness, density, and complexity, but it must be sufficient to ensure the product has adequate structural integrity before being released from the mold, preventing any post-molding distortion.
Step 6: Ejection and Post-Molding Curing
Once the EPS product has been sufficiently cooled and solidified, the mold opens, and the finished item is ejected. Depending on the product’s size and complexity, various ejection mechanisms may be employed. For large blocks, they are typically conveyed out, while custom-shaped parts are often ejected by pins or robotic arms.
Following ejection, particularly for larger blocks or high-density items, a final post-molding curing period is often necessary. This involves allowing the product to “rest” in an open-air environment for a period ranging from several hours to several days.
During this time, any residual moisture from the steam process evaporates, and the internal air pressure within the EPS cells fully equalizes with the ambient atmosphere. This final curing process is vital for achieving the optimal physical properties of the EPS, such as long-term dimensional stability, preventing secondary shrinkage or warping, and ensuring the material reaches its full strength and insulation capability before further processing, packaging, or shipment.
EPS Shape Moulding Process
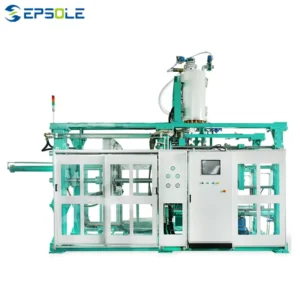
The EPS shape moulding process is a specialized manufacturing technique designed to produce customized Expanded Polystyrene (EPS) foam products with intricate and precise geometries. This method directly forms pre-expanded EPS beads into final shapes, eliminating the need for cutting from large blocks and optimizing material use.
Step 1: Pre-Expansion of EPS Beads
The process begins with pre-expanding raw polystyrene beads, which are impregnated with a blowing agent like pentane. In a pre-expander, steam heats these beads, causing the blowing agent to vaporize and expand, transforming the tiny beads into lightweight, porous spheres.
This initial expansion is critical for setting the target density of the final molded product. Precise control over steam temperature and residence time allows manufacturers to achieve varying bead densities, directly influencing the foam’s strength, insulation properties, and weight.
Step 2: Conditioning/Aging of Pre-Expanded Beads
After pre-expansion, the expanded beads are transferred to aging silos or breathable bags. During this conditioning period, the beads cool, and air slowly diffuses into their cells, equalizing internal and external pressures.
This aging step stabilizes the beads, preventing shrinkage and improving their resilience for the subsequent molding process. Properly conditioned beads ensure consistent product quality, optimal fusion, and minimal defects in the final shaped item.
Step 3: Filling the Shape Mold
Once conditioned, the pre-expanded EPS beads are pneumatically conveyed into the precisely designed cavity of a heated shape mold. This mold is crafted to the exact dimensions and intricate details of the final desired product.
Efficient and uniform filling of the mold is paramount to prevent voids and ensure consistent density throughout the complex shape. Advanced machines use vacuum assistance and controlled bead injection to achieve complete and even filling, especially for multi-cavity molds.
Step 4: Steam Chest Molding and Fusion
With the mold cavity fully packed, steam is injected into the mold. The steam heats the pre-expanded beads, causing them to further expand and soften. This expansion forces the beads into tight contact with each other and the mold’s internal surfaces.
Under this combined heat and pressure, the softened surfaces of the individual beads fuse together, forming a strong, monolithic EPS foam product. This fusion creates the closed-cell structure, perfectly replicating the mold’s complex contours and ensuring structural integrity.
Step 5: Cooling and Vacuum Application
Immediately following fusion, the mold is rapidly cooled, typically by circulating cold water through integrated channels. This quick cooling solidifies the newly formed EPS part, allowing it to maintain its precise shape upon ejection.
Often, a vacuum system is simultaneously applied during or after cooling. The vacuum helps to draw out residual steam and moisture, further accelerating the cooling process, reducing internal pressure within the foam, and aiding in the efficient and non-damaging ejection of the product.
Step 6: Ejection and Post-Molding Curing
Once the EPS product has sufficiently solidified, the mold opens, and the precisely shaped part is ejected, often with pneumatic pushers or robotic arms. The finished part is then typically moved to a curing area.
This post-molding curing period, which can range from hours to days, allows any remaining moisture to evaporate and internal cell pressures to fully equalize with the atmosphere. This critical step ensures the product’s long-term dimensional stability, preventing shrinkage or warping and optimizing its final performance characteristics before packaging or further use.
EPS Block Moulding Process
-1-300x300.webp)
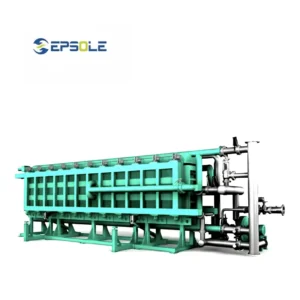
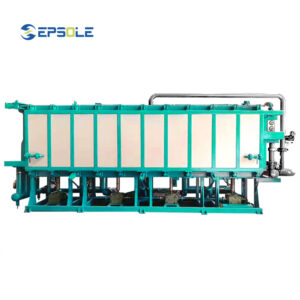
The EPS (Expanded Polystyrene) block moulding process is a fundamental manufacturing method for producing large, rectangular blocks of EPS foam from pre-expanded beads. These blocks serve as the raw material for a wide array of applications, later cut into specific shapes, sheets, or panels.
Step 1: Pre-Expansion of EPS Beads
The process begins with the pre-expansion of raw polystyrene beads, which contain a blowing agent like pentane. These beads are introduced into a pre-expander, where steam is injected to heat them. This causes the pentane to vaporize and expand, transforming the dense beads into much larger, lightweight, and porous spheres.
This initial expansion is crucial for determining the final density of the EPS block. By precisely controlling the steam temperature, pressure, and the time the beads spend in the pre-expander, manufacturers can achieve the exact desired density, which directly impacts the block’s insulation properties and compressive strength.
Step 2: Conditioning/Aging of Pre-Expanded Beads
Following pre-expansion, the expanded beads are pneumatically conveyed into large storage silos or breathable bags for a conditioning (or aging) period. During this time, the beads cool, and ambient air slowly diffuses into their internal cells.
This critical aging step equalizes the internal pressure within the beads with the external atmospheric pressure, preventing subsequent shrinkage and making them more resilient. Proper conditioning ensures the beads are stable and prepared for optimal fusion during the block molding stage, leading to a consistent and defect-free final product.
Step 3: Filling the Block Mold
Once conditioned, the pre-expanded EPS beads are rapidly transferred into the large, rectangular cavity of a block molding machine. The mold is pre-heated to ensure optimal conditions for the beads.
Efficient and uniform filling of this substantial cavity is paramount to avoid voids and achieve a consistent density throughout the entire block. Modern block molding machines often employ sophisticated pneumatic systems to ensure even distribution and packing of the beads within the large mold volume.
Step 4: Steam Chest Molding and Fusion
With the mold fully packed with pre-expanded beads, high-temperature steam is injected into the mold cavity, typically through numerous small holes or “steam chests.” This steam re-heats the beads, causing them to further expand and soften.
As the beads expand, they are forced into tight contact with each other and the mold walls. Under this combined heat and pressure, the softened surfaces of the individual beads fuse together, forming a solid, monolithic EPS foam block with a characteristic closed-cell structure.
Step 5: Cooling
Immediately after the steam heating phase, the mold is rapidly cooled, usually by circulating cold water through channels integrated into the mold walls. This quick cooling solidifies the newly formed EPS block, allowing it to maintain its precise rectangular shape and dimensional stability.
Effective cooling is crucial to prevent the block from deforming, shrinking, or collapsing upon ejection. It also reduces the internal pressure within the EPS cells, further stabilizing the foam structure and preparing the large block for handling and subsequent processing.
Step 6: Ejection and Post-Molding Curing
Once the EPS block has solidified sufficiently, the mold opens, and the large, rectangular EPS block is ejected, typically onto a conveyor system. The newly formed block is still warm and may contain residual moisture.
The block then undergoes a post-molding curing period, which can range from several hours to several days in an open-air environment. This allows any remaining moisture to evaporate and internal cell pressures to fully equalize, ensuring the block achieves its optimal dimensional stability, strength, and long-term performance before being cut or further processed.
EPS Shape Moulding vs EPS Block Moulding
EPS Shape Moulding and EPS Block Moulding are two distinct manufacturing processes for Expanded Polystyrene, each tailored to specific product requirements and production scales. While both transform pre-expanded beads, their methodologies and end products differ significantly.
Purpose and Output
EPS Shape Moulding is designed to produce final, custom-shaped products directly from the expanded beads. The output is a finished item, such as a packaging insert, a complex automotive component, or a decorative element, that requires no further cutting or minimal trimming. The mold cavity precisely defines the product’s intricate geometry, allowing for highly specialized and ready-to-use items.
In contrast, EPS Block Moulding produces large, rectangular blocks of EPS foam. These blocks are not typically the final product themselves but serve as a raw material. After molding, these substantial blocks are then transported to cutting machines where they are sliced into various sheets, panels, or further processed into custom shapes. This method is suited for applications requiring large quantities of standard-sized foam or when complex shapes need to be cut from a larger foam mass.
Mold Design and Complexity
EPS Shape Moulding utilizes highly intricate and often multi-part molds that precisely replicate the desired final product’s contours, curves, and details. These molds can be complex, incorporating features like undercuts, inserts, and multiple cavities to create sophisticated geometries. The design focuses on ejecting a finished, ready-to-use item.
EPS Block Moulding employs much simpler, typically large, rectangular molds. While robust and designed to withstand significant pressure, their internal geometry is straightforward, reflecting the basic block shape. The complexity lies more in the scale and structural integrity required for forming such large foam masses, rather than intricate detailing of the mold cavity itself.
Production Volume and Flexibility
EPS Shape Moulding machines are often optimized for higher volume production of specific, repetitive parts due to the dedicated nature of their molds. Once a mold is designed and set up, it can efficiently churn out thousands of identical items. However, changing the product shape requires a new, dedicated mold, limiting flexibility for varied small-batch production without significant downtime or investment.
EPS Block Moulding offers greater flexibility in terms of the final product dimensions that can be derived from a single block. While the blocks themselves are standardized, they can be cut into virtually any size, thickness, or shape post-molding. This makes it highly adaptable for diverse customer demands, though it adds a secondary cutting process step.
Tooling Costs
The tooling costs associated with EPS Shape Moulding are generally higher per unique product. Designing and fabricating the precise, intricate molds for custom shapes involves significant engineering and machining, especially for complex or multi-cavity designs. Each new product shape typically requires a new mold, representing a substantial upfront investment.
For EPS Block Moulding, the tooling costs for the block molds themselves are comparatively lower. Since the molds are large but geometrically simple rectangles, their design and manufacturing are less complex than intricate shape molds. The investment is more in the large-scale block molding machinery itself rather than diverse, product-specific molds.
Post-Moulding Processing
In EPS Shape Moulding, the post-molding processing is typically minimal, often limited to simple deflashing (removing small excess material) or quality checks. The product emerges largely in its final form, ready for assembly, packaging, or direct use, leading to a more streamlined and less labor-intensive finishing phase.
Conversely, EPS Block Moulding inherently requires extensive post-molding processing. The large blocks must be transported to a separate cutting area, where hot wire cutters or other specialized equipment slice them into the desired sheets, panels, or custom shapes. This adds an additional, significant step in the overall manufacturing timeline and can incur extra labor and material handling costs.
Here are some differences between EPS Shape Moulding vs EPS Block Moulding
| Feature | EPS Shape Moulding | EPS Block Moulding |
| Primary Output | Finished, custom-shaped products | Large, rectangular blocks of EPS foam |
| Mold Complexity | High (intricate, multi-part, detailed) | Low (simple, large rectangular) |
| Product Versatility | High (for specific, pre-designed shapes) | High (post-molding cutting into various forms) |
| Tooling Cost | Higher (per unique product shape) | Lower (for the mold itself) |
| Post-Moulding Steps | Minimal (deflashing, quality check) | Extensive (cutting, shaping, trimming) |
| Production Scale | High volume for repetitive, dedicated parts | High volume for standard blocks, then custom cuts |
| Material Usage | Optimized for specific shape, less material waste | Requires cutting, leading to some material waste |
| Applications | Packaging inserts, automotive parts, helmets | Insulation panels, geofoam, construction blocks |
Conclusion
The EPS moulding process, particularly when considering sustainability, demands careful attention to energy efficiency, material usage, and waste reduction. By optimizing steam consumption, streamlining cooling cycles, and meticulously managing raw material input, manufacturers can significantly lessen their environmental footprint. Embracing a circular economy by prioritizing the recycling of pre-consumer and post-consumer EPS is also paramount for sustainable production.
Sustainable EPS moulding isn’t just an environmental imperative; it’s a smart business strategy. Efficient processes lead to lower energy bills and reduced material waste, translating directly into cost savings. Furthermore, producing eco-friendly EPS products enhances brand reputation and meets growing consumer and regulatory demands for sustainable materials, fostering long-term market competitiveness.
To support your sustainable EPS moulding operations, we offer wholesale EPS moulding machines from Qingdao, Shandong, China. Our advanced machinery is designed with energy efficiency and precision in mind, helping you achieve high-quality, sustainable production. Partner with us for reliable equipment that contributes to a greener future.