Installing geofoam requires a systematic approach to leverage its lightweight and stable properties effectively in construction projects. Proper handling and placement are crucial for ensuring the long-term performance and stability of the structure. This guide will walk you through the essential steps for a successful geofoam installation.
From preparing the site to securing the final layer, each stage plays a vital role in creating a durable and reliable geofoam structure. By following these step-by-step instructions, you can confidently incorporate geofoam into your projects, whether for lightweight fill, slope stabilization, or other innovative applications.
What Is Geofoam
Geofoam is a lightweight fill material engineered from expanded polystyrene (EPS). It is manufactured by expanding polystyrene beads and then fusing them together to create large, lightweight blocks. The resulting material is remarkably light, often around 1% of the weight of traditional soil fill, making it an advantageous alternative in various construction applications.
Its primary use lies in reducing the load on underlying soils and structures in civil engineering projects. Geofoam is employed in the construction of roads and bridges over weak soils, for slope stabilization, as backfill for retaining walls, and as a lightweight void fill. Its ease of handling, durability, and resistance to water absorption make it a versatile and effective solution in geotechnical engineering.
How to Install Geofoam
Installing geofoam correctly is crucial for ensuring the stability and longevity of any project utilizing this lightweight fill material. These steps provide a comprehensive guide to the proper installation techniques, helping you maximize the benefits of geofoam in your construction endeavors. Careful attention to each phase will result in a structurally sound and efficient outcome.
Step 1: Site Preparation and Subgrade Compaction
Before you begin placing any geofoam blocks, thorough site preparation is paramount. This involves clearing the area of any vegetation, debris, or unsuitable topsoil. Following the clearing, you need to ensure the subgrade, the underlying soil upon which the geofoam will rest, is properly graded and compacted according to the project specifications. This compacted subgrade provides a stable and level foundation, preventing uneven settlement and ensuring the geofoam blocks are supported uniformly.
The process of subgrade compaction typically involves using mechanical equipment like rollers or compactors to increase the density of the soil. You should perform this compaction in layers, ensuring each layer meets the required density before placing the next. The project’s geotechnical report will specify the necessary compaction requirements, including the type of equipment, the number of passes, and the moisture content of the soil. A well-prepared and compacted subgrade is essential for the overall stability of the geofoam structure and the overlying construction.
Once the subgrade is compacted, you should verify its levelness and grade accuracy using surveying equipment. Any significant deviations from the design elevation need to be corrected before proceeding with geofoam placement. A level subgrade ensures that the geofoam blocks are installed evenly, preventing stress concentrations and maintaining the intended design geometry of the fill. Taking the time to properly prepare and compact the subgrade is a critical first step in a successful geofoam installation.
Step 2: Geofoam Block Placement
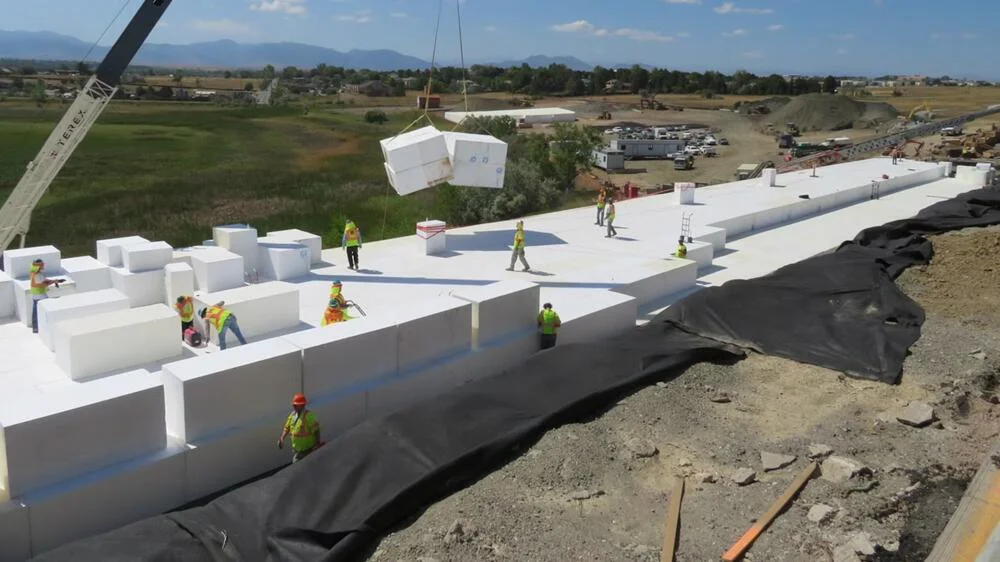
With the subgrade properly prepared, you can begin the placement of the geofoam blocks. These lightweight blocks should be handled carefully to avoid any damage during transportation and on-site movement. You’ll typically place the blocks in layers, following the project’s design layout and ensuring they are tightly butted against each other, both horizontally and vertically. This close placement minimizes gaps and creates a continuous, stable fill mass.
Depending on the project requirements and the size of the geofoam blocks, you might need to use lifting equipment, although often the blocks can be moved and positioned manually due to their light weight. It’s important to follow the manufacturer’s recommendations for handling and placement to prevent any structural damage to the blocks. For projects requiring multiple layers, you should stagger the joints between successive layers to enhance the overall stability and prevent continuous vertical seams.
During placement, you should regularly check the alignment and levelness of the geofoam blocks to ensure they are installed according to the design specifications. Any minor adjustments can usually be made easily due to the lightweight nature of the material. For more complex geometries or curved sections, you might need to cut the geofoam blocks on-site using specialized hot-wire cutters or saws. Precision in placement is key to achieving the intended fill volume and structural performance of the geofoam installation.
Step 3: Interlocking or Connection of Blocks (If Applicable)
For some geofoam block designs, particularly those used in more demanding structural applications like retaining wall backfill or slope stabilization, interlocking features or connection methods may be required. These features, such as tongue-and-groove edges or the use of mechanical connectors, help to create a more integrated and stable geofoam mass. If your project utilizes such blocks, you must ensure that these interlocking mechanisms are properly engaged during placement.
When using blocks with tongue-and-groove edges, you’ll need to carefully align and slide the blocks together to create a secure connection. For mechanical connectors, such as straps or anchors, you should follow the manufacturer’s instructions for their installation and spacing. These connectors help to resist shear forces and maintain the integrity of the geofoam fill, especially in applications where lateral forces are significant.
The proper interlocking or connection of geofoam blocks enhances the overall stability and load-bearing capacity of the geofoam structure. It minimizes the potential for individual blocks to shift or move relative to each other, ensuring the fill acts as a cohesive unit. Paying close attention to these connection details during the placement process is crucial for the long-term performance and safety of the geofoam installation, particularly in critical structural applications.
Step 4: Protection Layer Installation
Once the geofoam blocks are placed and, if applicable, properly interlocked or connected, the next step typically involves installing a protection layer over the geofoam. This layer serves several purposes, including protecting the geofoam from potential damage during subsequent construction activities, distributing loads evenly across the geofoam surface, and preventing the infiltration of debris or other materials into the geofoam block joints.
The type of protection layer can vary depending on the specific application and the overlying construction. Common protection materials include a layer of granular fill (such as sand or gravel), a concrete slab, or a geotextile fabric. For road construction, a layer of aggregate base course is typically placed over the geofoam to distribute traffic loads. When used as backfill for retaining walls, a geotextile might be used to prevent soil particles from migrating into the geofoam.
You should install the protection layer according to the project specifications, ensuring it covers the entire geofoam surface and achieves the required thickness and density. For granular fill, proper compaction is usually necessary to ensure adequate load distribution. The protection layer acts as a crucial interface between the relatively soft geofoam and the potentially heavier loads or construction activities that will occur above it, contributing significantly to the longevity and performance of the geofoam installation.
Step 5: Overlaying Construction
The final step involves proceeding with the overlaying construction, which will depend entirely on the specific application of the geofoam. For road construction, this would involve placing the sub-base, base course, and asphalt or concrete pavement layers over the load distribution layer. In building construction, this might involve pouring a concrete slab over the geofoam used as lightweight fill or insulation. For retaining walls, this would be the construction of the wall facing and any necessary drainage systems.
You must ensure that the loads imposed by the overlaying construction are within the design capacity of the geofoam and the protection layer. Heavy equipment operating directly on the geofoam without adequate protection can cause damage. Following the project’s structural design and construction sequence is crucial at this stage.
The successful completion of the overlaying construction marks the finalization of the geofoam installation. The lightweight and stable geofoam fill will now provide its intended benefits, whether it’s reducing settlement in a roadbed, minimizing lateral pressure on a retaining wall, or providing lightweight support for a structure. Proper installation in the preceding steps is essential for ensuring the long-term performance and durability of the entire construction.
Tips for Geofoam Installation
Efficient and effective geofoam installation is crucial for maximizing the benefits of this lightweight fill material in your construction projects. By adhering to best practices and paying close attention to each stage of the process, you can ensure a stable, durable, and long-lasting outcome.
These tips provide essential guidance for a successful geofoam installation.
- Ensure compatibility with adjacent materials: Consider how the geofoam interacts with surrounding soil, concrete, or other construction materials.
- Prepare the subgrade thoroughly: Ensure it’s level, compacted, and free of debris to provide a stable base.
- Handle blocks carefully: Geofoam is lightweight but can be damaged by rough handling, so avoid dropping or dragging.
- Butt blocks tightly: Minimize gaps between blocks for a continuous and stable fill.
- Stagger joints in multi-layer applications: This enhances stability and prevents continuous vertical seams.
- Use appropriate cutting tools: Employ hot-wire cutters or saws designed for foam to achieve clean and accurate cuts.
- Protect the geofoam surface: Use a protection layer like granular fill or a concrete slab to distribute loads and prevent damage.
- Follow manufacturer guidelines: Adhere to the specific recommendations provided by the geofoam supplier for optimal installation.
- Implement proper drainage: Prevent water accumulation within or around the geofoam fill to maintain its properties.
- Conduct regular inspections: Check for any damage or misalignment during installation and address issues promptly.
Where You Can Install Geofoam
Geofoam for Road Construction
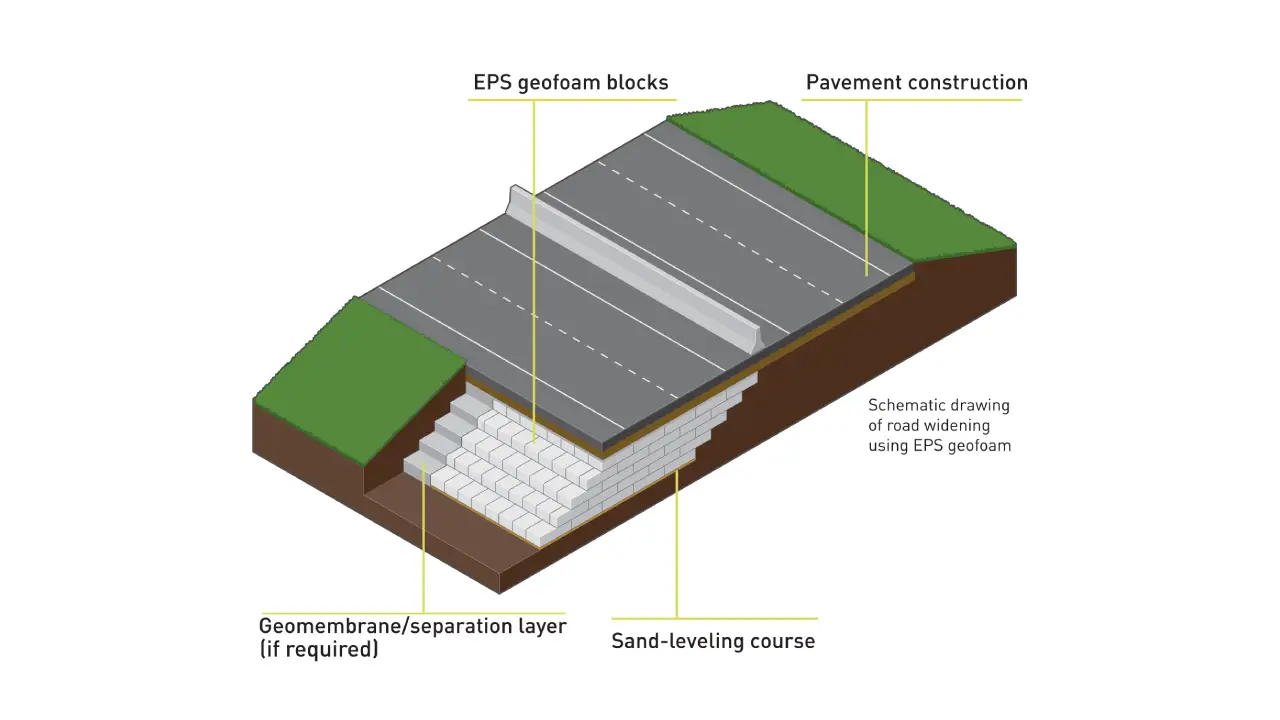
Geofoam has become a popular choice in road construction, especially in areas with challenging soil conditions. Its lightweight nature significantly reduces the load on the subgrade, minimizing settlement issues that are common when building over soft or compressible soils. This allows for the construction of stable and durable roadbeds in locations where traditional fill materials would be impractical or require extensive ground improvement. Furthermore, geofoam’s ease of installation can expedite project timelines and reduce the overall construction costs associated with heavy equipment and extensive labor.
Geofoam for Bridge Abutments and Approaches
The lightweight properties of geofoam make it an excellent material for constructing bridge abutments and approach embankments. By using geofoam as fill, the lateral and vertical loads on the supporting soil and the bridge structure itself are significantly reduced. This can be particularly beneficial in areas with weak soils, where the added weight of traditional fill could compromise the stability of the bridge. Geofoam’s ease of shaping also allows for the creation of complex geometries often required in bridge approach designs, ensuring a smooth transition onto the bridge deck.
Geofoam for Slope Stabilization
In areas prone to landslides or soil erosion, geofoam can be employed as a lightweight fill material to enhance slope stability. By replacing heavy soil with geofoam in the critical areas of a slope, the driving forces that contribute to slope failure are reduced. This can be a cost-effective and less disruptive method compared to traditional slope stabilization techniques like retaining walls or soil reinforcement. The ease of handling geofoam also allows for installation in difficult-to-access areas, making it a versatile tool for mitigating slope instability risks.
Geofoam for Retaining Wall Backfill
Geofoam can be used as backfill material behind retaining walls, offering a significant advantage over traditional soil fill. Its extremely low density reduces the lateral earth pressure exerted on the wall, allowing for the design and construction of more slender and cost-effective retaining structures. The reduced weight also simplifies the installation process, as less heavy equipment is required for placement. Furthermore, geofoam’s excellent drainage properties can help minimize hydrostatic pressure behind the wall, contributing to its long-term stability and preventing potential failure due to water buildup.
Geofoam for Lightweight Embankments and Fills
Beyond specific infrastructure projects, geofoam is widely used for creating lightweight embankments and general fill in various construction applications. This is particularly useful in situations where adding significant weight to the underlying soil is undesirable, such as over underground utilities, tunnels, or existing structures. Geofoam’s ease of shaping allows for the creation of specific contours and elevations in landscaping projects or for building up areas without imposing excessive loads. Its inert nature and resistance to decomposition also ensure the long-term stability and performance of these lightweight fills.
Conclusion
Proper geofoam installation is paramount to leveraging its lightweight and stable properties in construction projects. Following a systematic approach, from site preparation to load distribution layer placement, ensures the long-term performance and stability of the structure. Attention to detail at each step minimizes potential issues and maximizes the benefits of using geofoam.
The ease of handling and shaping geofoam allows for efficient installation in various applications, from roadbeds to lightweight fill. By adhering to best practices and manufacturer guidelines, you can ensure a successful and durable geofoam installation that meets the specific requirements of your project.
Ready to simplify your construction projects with efficient geofoam installation? Contact us today for wholesale geofoam blocks and expert guidance. Our top-rated geofoam solutions and support will help you achieve exceptional results.